The Results Table
Working With Results
The results table has extensive tools and functionality to help you effectively resolve open issues and prepare your batch for provisioning. The next three sections will cover these tools.
Understanding The Results Table
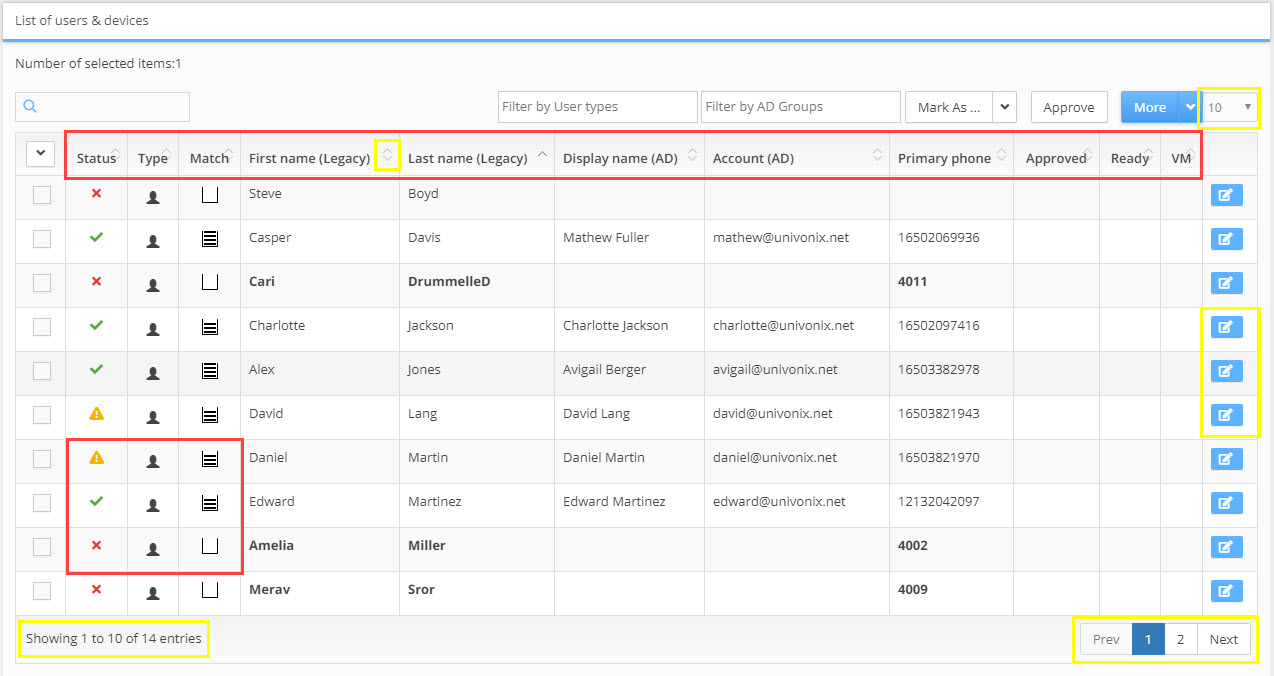
Results Table Columns
Status |
The icon in this column indicates the current readiness for provisioning of this user or device. Readiness options include:
|
Type |
The icon in this column indicates the type of user or device. Type options include:
|
Match |
The icon in this column indicates with what level of certainty the system has matched the user to the target PBX.
Hovering over the icon with the mouse, will show the reason for the certainty level. |
First Name (Legacy) |
The first name of the user or device as configured in the legacy PBX configuration |
Last Name (Legacy) |
The last name of the user or device as configured in the legacy PBX configuration |
Display Name (AD) |
The display name as it appears in the Active Directory. If the user is not mapped to an AD entry, this field will be left empty |
Account (AD) |
The email address reference as it appears in AD. If the user is not mapped to an AD entry, this field will be left empty |
Primary Phone |
The phone number/extension for the user or device (Multiple phone numbers is not supported by Teams, in this situation you will select the primary number in the users details and that number will appear here) |
Approved |
The icon in this column |
Ready |
The icon in this column |
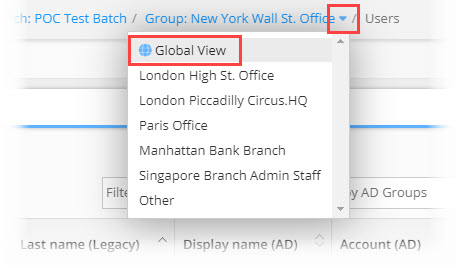
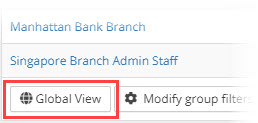
Group |
Displays which group the user or device line is a member of. This column only appears in the results table when you select Global View By default the results table shows only results for the Group you selected when you opened Users & Devices Global View will allow you to see results for ALL the users and devices in all the groups that are associated with that specific Batch To open Global View: From the bread crumbs navigation bar click on the down arrow and select Global View from the drop down menu
From the Batch dashboard at the bottom left hand corner of the Groups table, click on the Global View button
|


How Many Results: to know how many results you have in the current results set, look at the bottom left hand corner of the results table. 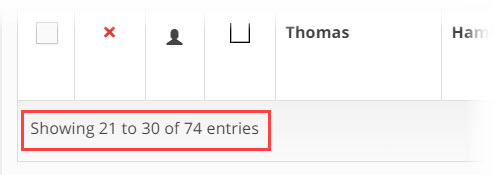
Columns: can be ordered by clicking on ![]() the column ordering icon which is found in the header of every column. Clicking on the icon will order the results in alphanumeric value from lowest to highest. Clicking the icon again will swap the order and the results will be shown in alphanumeric value from highest to lowest.
the column ordering icon which is found in the header of every column. Clicking on the icon will order the results in alphanumeric value from lowest to highest. Clicking the icon again will swap the order and the results will be shown in alphanumeric value from highest to lowest.
Results Per Page: you can change the number of results that appear on a page by opening the results per page drop down which is found in the top right hand corner of the results table. Select the number of results you want to see per page. There is a minimum or 10 and a maximum of 100 results per page. 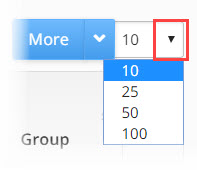
Navigating Between Pages: the number of table results may expand beyond the limits of a single page, to navigate to additional pages of results, use the page navigation bar in the bottom right hand corner of the results table page. To move to the next page or return to the previous page click on the Next or Prev (previous) buttons. To skip to a specific page, click on the page number button of the page you want to skip to. 
Result Details
To understand why the status of a user or device can not be migrated and what issues need to be resolved, click on the ![]() details icon in the last column of each row. This will open the User/Device Details window, where you can see, edit and update the various user details and clear any issues that are blocking migration.
details icon in the last column of each row. This will open the User/Device Details window, where you can see, edit and update the various user details and clear any issues that are blocking migration.
How to work with the User/Device Details window will be covered in the Actioning Open Issues section.