Univonix Migration Methodology Workflow
Univonix Migration Methodology
In this section we provide a high level description of the Univonix Migration Methodology, broken down into project milestones and the key steps to be completed to reach each milestone.
The layout of this user guide will follow this migration methodology workflow, the user guide will present detailed 'step by step' instructions on how to use the Univonix applications to complete each step. It is recommended that you refer back to this workflow at the completion of each milestone to check that all steps have been taken and that you are ready to advance to the next milestone!
Migration Project Milestones & Key Steps:
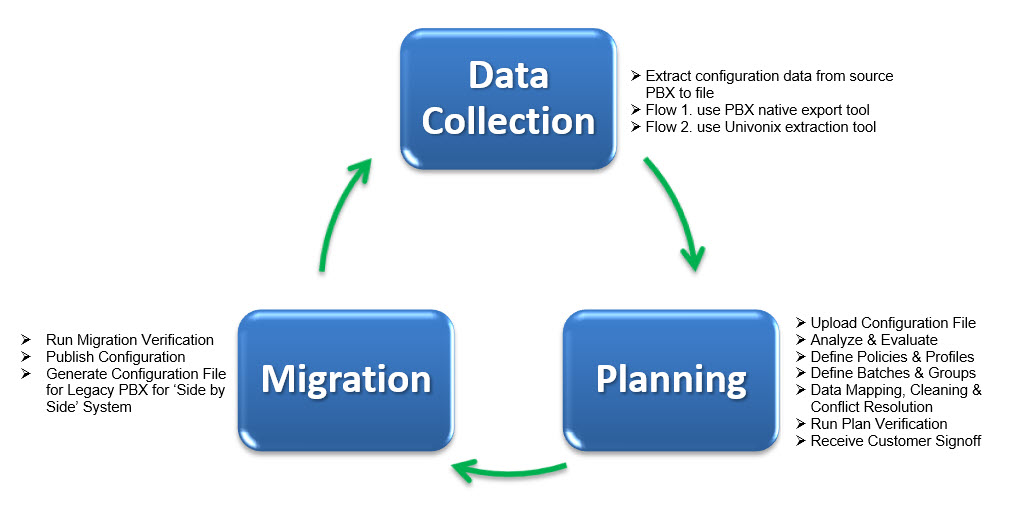
Data Collection Key Steps
Step |
Action |
Note |
Time |
Pre-Requisite |
1a |
Extract Configuration Data: when there is a native export tool in the source PBX e.g. CISCO |
|||
2a |
Log into source PBX and follow standard procedure to extract ALL configuration data to file Deliverable: Configuration File |
Several hours per PBX |
Network Access & Credentials to Source PBX |
|
1b |
Extract Configuration Data: when the Univonix Export Tool is required to export data from source PBX e.g. Avaya, Nortel |
|||
2b |
Download Univonix Export Tool from Univonix System > Resources page |
Access and user rights to Univonix online applications |
||
3b |
Load export tool on computer that has network access to the source PBX |
Access to the correct networked computer Rights to load and run third party software on the computer |
||
4b |
Open Export tool and extract ALL configuration data to file Deliverable: Configuration File |
Several hours per PBX |
Network Access & Credentials to Source PBX |
Migration Planning Key Steps
- The migration project is typically executed in phases, broken down by ‘batches.’
- Multiple batches can be created and defined in parallel.
- There is no need to complete the planning of all batches to begin provisioning.
- Provisioning can begin on completed batches in parallel to planning new batches.
Step |
Action |
Note |
Time |
Pre-Requisite |
1 |
Open New Migration Project in Univonix Planner |
When a customer has several legacy PBXs, a separate project is needed for each one. Each legacy PBX is migrated separately. |
5 minutes per PBX |
Credentials to Univonix system Credentials of target PBX |
2 |
Upload source PBX configuration file to Univonix Planner |
System will process and analyze the data, user does not need to wait for processing to complete, can continue to open and work on additional projects |
Up to 48 hours per PBX |
Configuration file |
3 |
Define required policies in target PBX |
As per customer requirements |
Credentials of target PBX List of required policies |
|
4 |
Define Persona Profiles |
You can always add/change the Persona Profiles. This should not stop the planning process; you can start with a default profile and add additional profiles as you progress |
Dependent on customer environment |
|
5 |
Define Batches and Groups |
A typical batch/group represents a physical location. (e.g. site, building, floor) or a work team or department. The definition of a group is based on parameters from the source PBX such as number range, locations, call/dial permissions etc It is recommended that your first batch be a ‘TEST’ batch of a small number of users with a diverse range of requirements; local calling, international calling, hunt groups, pickup groups etc. |
If needed provide list of extensions or # ranges, patterns per group |
6 |
Create E164 extension normalization rules |
E164 extension guidelines from the customer |
||
7 |
Resolve All Open Issues; For a Microsoft Team target this would include:
|
The time needed to complete the following 4 steps is dependent on prompt feedback form the customer e.g.; what to do with a user who has multiple extensions, or input on the owner of an unmatched extension etc. |
||
8 |
Assign persona profile per user (can be done in bulk) |
|||
9 |
Run plan verification and resolve any issues (e.g. breaking boss/admin, hunt group, missing licenses etc.) |
|||
10 |
Send to customer for approval (excel file generated by Univonix system) |
|||
11 |
Load approved excel file into Univonix Planner |
Approved excel file |
||
12 |
Repeat steps 4 through 11 per batch |
|||
13 |
Reports: At any stage in the planning process you can extract status reports to excel |
Note: The following external process must be completed before moving to the Provisioning stage;
- Port the required numbers as specified in the planning report
- Distribute endpoint devices and train end users on the new equipment / applications
- Deploy and configure required network equipment such as SBC’s, gateways etc
Provisioning Key Steps
Step |
Action |
Note |
Time |
Pre-Requisite |
1 |
Run Migration Verification (e.g. verify license availability, relevant numbers are ported etc.) |
|||
2 |
Publish configuration to target system including telephony features pre-configured & send welcome / configuration email to end users (optional) |
Verification step completed successfully |
||
3 |
For Side by Side systems: Univonix generated configuration file for source PBX |
The Univonix Migration tool will generate a configuration file for the Legacy PBX with ‘forward all’, for migrated users, to maintain seamless communication during the migration process |
Trunk setup between legacy PBX to Target PBX PSTN can also be used |
|
4 |
Upload configuration file into the legacy PBX, process dependent on PBX type |
Flow 1. use legacy PBX native import tool Flow 2. use Univonix Import tool |
Network access & credentials to legacy PBX system Side by Side Configuration file Univonix Export Tool if needed |
|
5 |
Repeat step 1 through 4 for all batches |